

Mk49 Pepper Potts Rescue Cosplay Armor build
Hi all, we're Aaron & Julie! We're a husband & wife cosplay/maker duo and this is our first full armor build. You can find us on social media at https://www.instagram.com/roguesgalleryfitness/
In this build thread we'll take you through the entire process of making this cosplay! We hope you find this helpful as you start your own 3D printed cosplay journey.

Photo by Dave Gallagher
Part I - 3D Models
This cosplay has been a pipe dream of ours since long before Avengers Endgame. Pepper Potts first suited up as Rescue over ten years ago in Matt Fraction's run on Marvel Comics' Iron Man. Seeing the suit (albeit briefly) in Endgame kicked us into high gear.
We have been 3D printing cosplay props for about two years now, but had never done anything more complex than a helmet. We aren't 3D modelers so our first job was to find a suit model that had the accuracy, quality, and the overall look we wanted. There are a few Rescue 3D models out there but @Do3D.com checked all the boxes for us. Often times it's difficult for female armor to look svelte and not "boxy" so this was one main reason we went with this model.

We used the program Armorsmith for all the sizing & scaling. We highly recommend this product as you can input your physical dimensions and scale each piece of armor individually to fit your body. No two people are alike and printing a 3D model at scale will most likely not work without a lot of modification.

Part II - Printing the models
The filament we used for the majority of the suit was Hatchbox PLA, about 12 rolls total.
We printed the majority of the suit at .2mm layer height on a .4mm nozzle. This seemed to be the best balance of quality and speed. @Do3D.com models are really well made, and since each one is structurally closed we were able to print the majority of the armor pieces with 3 walls, hollow (0% infill). This sped up the printing and reduced weight.
We started off printing the helmet. It came out fairly well, but we realized our little Anet A8 was going to be too small to build an entire suit of armor. We decided to upgrade to a Creality CR-10S Pro to run concurrently.

After success with the helmet, we began by printing the left arm. This was an attempt to verify that our scale was right without wasting too much filament - and it was the right move. It turned out the bicep was a bit too large so we rescaled and printed again.


Once the forearm, bicep, and outer shoulder was complete we could eyeball scale.

Next we printed the chest - this was sliced into four parts and eventually epoxied together. The epoxy was difficult to work with so after this point, we used a product called 3D Gloop. This actually melts the PLA together which seemed to result in a better bond. We also plastic weld the inside seam for added strength.


The next piece was the upper back, which was again split into four. The Rescue back panel includes a set of four removable flaps which we printed later.


Once the back printed, we printed the right arm and pretty soon had a complete upper torso. We then printed the ab section, codpiece and rear. And had enough parts to do a full torso test!


We then printed the legs which were a time consuming but straightforward process.


Neck seal printed in flexible filament:


Part III - Finish work & Paint
The most critical part of this build (or any 3D printed project, in our opinion) is the finish work. Our goal is usually to finish a part to the point where you can't tell it was printed, but this is especially true for an Iron Man armor which is supposed to look like metal. Our inspiration that we kept coming back to was "the hood of a hot rod".

Photo by Josh Totman
To achieve such a finish, we tested many methods for finish work. Here's the process we ended up with that generally worked for us:
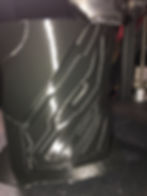
1. Sand the bare print (electric "mouse" sander for large areas, hand sanding for details)
2. Primer
3. Body filler, spot putty as necessary
4. Wetsand the primer smooth


An unfinished vs finished knee piece:


As for paint, we wanted this armor to "pop". We took the "hot rod paint job" seriously and went with a custom mixed three-stage Candy Paint from House of Kolor. This blue-purple paint consists of a ground coat, then several layers of candy coat (pearlescent and metal flake) and finally the 2k clear coat. We applied this as you would a car: we set up a paint booth in our garage and sprayed with a HVLP gravity-feed spray gun and air compressor.


The result is a really deep indigo blue-purple that color shifts depending on lighting. The resulting cosplay has been photographed as bright as blue or even a dark purple!
Photo by Josh Totman


Photo by Lance Allen Reis
For the gold details, we used a Krylon product called 18k gold metallic.

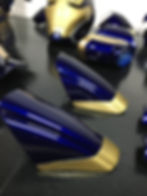
For the silver details, we used a spray paint called Spaz Stix mirror chrome.


Part IV - Mounting & Wearing
Unfortunately we don't have too many photos for this part of the process. We used a series of straps and buckles to keep the chest and back connected and locking magnets to keep armor panels aligned.
The upper torso, lower torso, and codpiece are independent of one another to allow for movement. First full fit-test:

Close up of the locking magnets that keep the rigid pieces held together:

Part V - Electronics
For our initial build, we were targeting a debut at Emerald City Comic Con in March 2020. We finished before our deadline but the convention was postponed due to Coronavirus concerns.
Due to our tight timeline we kept the electronics fairly simple:
LED lighting for helmet eyes
Motorized flip-up faceplate
LED arc reactor
LED repulsor in palms
We purchased a complete motorized faceplate kit with light-up eyes on Etsy. It's a universal kit so it took some work to get it to fit right, but it works. We used a USB-rechargeable battery-powered LED disk light for the arc reactor and LED flashlights that we took apart and wired into the palms. We will be expanding our electronics in the suit to include a central power system and motorized wings (back flaps).

Part VI - Finished Product
Here are some photos of the suit worn by Julie!

Photo by Charlie Liu

Photo by Lance Allen Reis

Photo by Dave Gallagher

Photo by Josh Totman

Photo by Anthony Vierra
Great article! I particularly liked [specific point]. Thanks for sharing!
VIPRE Rescue Scanner Download 2024