

Painting a 3d print
So you've printed your nice new armour, now the difficult bit, painting! I can't stress this enough, the more time you put into the prep work the better the finish will be, I didn't take progress pictures of the Iron Patriot helmet I actually use, but did take pics of the test helmet, so I didn't go too mad on this helmet as it was to test the size and fit with the electronics fitted, so buckle up and sit back
I use car paints, basically because they are easy to get hold of and tried and tested, they are easy to polish / refinish when you're done and most rattle cans from hardware stores of metallic colours have the clearcoat built in.
Firstly you will need
90-100 grit wet and dry paper
180 grit wet and dry paper
400 grit wet and dry paper
800 grit wet and dry paper
1000 grit wet and dry paper
1k Spot putty
filler primer
whatever colours you want to use
Masking taper (decent quality)
Face mask
somewhere clean and dry (outside isn't a good idea, but if you must it has to be a hot non-windy day)

so heres the helmet, I've printed it, welded it togther with a soldering iron, and filled the seam with some 1k putty

you can see the print was done fast at .3 it has quite a bit of ghosting, so it going to take some work, a good going over with 100grit wet and dry and a lot of water (don't use an electric sander with water!!)

use a sanding block, and also wear gloves as 100 grit will take your finger prints clean off!

wet sanding means you'll have to let it dry out completely before you paint, at least 24 hours
Next you're onto the first round of filler primer

lots of thin coats to start with, 10 minutes between coats, the coats can get thicker as you go along.
Now every single imperfection will show up a mile :)
1st coat

2nd coat

last coat for now

what a mess!!
so now fill in all the worst bits with 1k filler

any really bad bit use filler putty, its cheaper then primer, over fill as it contracts when drying


now you're back to wet sanding, 100 grit is too much now, you'll just remove everything so go to around 180 grit


you need to repeat this as many times as necessary, each time increase the wet and dry grit, 400 > 600 > 800 etc the more times you do it and the smoother you get the primer the better your end paint will be


and again


once you're totally sick of sanding one final coat of primer and you're almost ready for the colour, let the primer dry completely, read the spray can ;) usually I leave at least 24 hours, then just before the colour a quick rub over with very high grit (dry) just to get any overspray off and rub off with lint free cloth
now onto the colour, READ THE CAN! shake it well for the time it says!! again lots of thin coats, 10 minutes between layers, take your time.


the helmet needs to be multi coloured, so first I paint the main colour, allow to dry AT LEAST 24 hours before even thinking of using masking tape on the new paint, here I painted the whole helmet silver to start with then masked off the parts that where staying silver and sprayed the blue, then more masking and spray the red, its a long slow process as you have to wait at least 24 hours between colours
take your time with the masking up, make sure the tape is perfectly flat, use a scalpel, and when panting use really really thin coats otherwise the paint will bleed under the tape!

and you end up with something like this
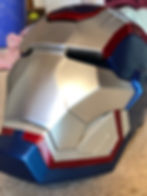
you can see the edges of the masking have rough edges, use car rubbing compound or t-cut to polish these down, unless you know what you're doing don't use a power tool to do this, its easy to burn the paint. those rough lines will polish right out as well as any over spray
As I said this is a quick mule helmet (and its not supposed to be high gloss anyway), in blue peter style here's an ironman helmet I spent a bit more time on

What about 2k paint?
Well yes, you get a much better finish, quicker and easier with 2k paint, a few points to consider, 2k paint is at least double the price of 1k paint, and its toxic, if you don't know what you're doing an you inhale the fumes you're screwed - this isn't an exaggeration, it will harden in your lungs.
please don't forget to use a mask when painting

Lado Lakshmi Yojana Haryana Apply Online portal allows girls to receive financial and educational support easily.