

Scaling with Armorsmith Designer
Scaling your armor to fit your body is a critical component to a successful cosplay. Not only can you easily waste hours of print time on parts that are too large/too small, but each piece must balance between fitting you and having the proper proportions. (Bobble Head Iron Man, anyone?)

Our latest build is @Do3D.com's Silver Centurion - the Mk33 armor from Iron Man 3. This suit is based on the classic red & silver suit Tony Stark used through the 80's and debuted in Iron Man #200, his battle with Obadiah Stane as Iron Monger. It's a fan-favorite armor that we can't wait to debut.

Disclaimer: There are many different approaches to scaling. This isn't the "one right way" and we aren't experts. But we wanted to share our method for scaling and perhaps it will help someone else. We aren't sponsored by Armorsmith in any way, just happy customers.
What you need:
The software we use for scaling is Armorsmith designer. It's designed by a cosplayer and can be purchased here: https://www.thearmoredgarage.com/ The cost as of writing is about $30 USD and is well worth it. We'd like to put together this quick tutorial on how we scale our armors to fit us for cosplay.
The advantage that Armorsmith gives you is the ability to easily input your real-life measurements into a tool, fit each component to your body digitally, and review the overall look to ensure it will fit properly.

Creating your avatar:
After you've set up & installed the software, you'll create a new avatar for yourself based on your dimensions. It's quite simple:
Put in your height in MM for a general scale:
Use a cloth measuring tape or tailor's tape to measure your body. Get a friend to help you with this part! For lengths, ensure that your "start" and "end" measuring points don't overlap (ex: upper arm added to lower arm length should equal your total arm length!)

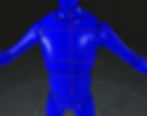
At this point you should have a general view of your 3d body in the tool:
Attaching your armor:
Now to attach some armor! Select "Import" to pull in one of your armor pieces (we'll start by building an arm)

Click "Attach Costume Part" which will bring up a series of attachment points on your model:

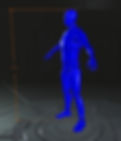
Click the upper arm to attach the bicep. In this case, it imported sideways so we'll want to rotate it a bit.

After moving the part in 3d space, we can see that the bicep is likely too small for the arm. This is why we use a bright color for the avatar, to easily catch areas where collisions occur (more on that in a future post).

After playing with the scale tool, we find that about 1.1 is about right for this arm.

Repeat this process until you have all the armor pieces attached, rotated, and scaled to fit your body. You only need to do one side of the arms and legs, and click the "mirror part" check box to visualize them on the opposite side.
The result is a digital suit of armor that fits you. At this point, you may want to make some additional scaling adjustments based on looks head too big/too small, something out of proportion, etc.

From here you can export each already-scaled piece so you don't need to keep track of the scaling factor for each part. Just pull it out of Armorsmith and load it into your slicer for printing.
Hope this helped! Please feel free to ask any questions!


Your step‑by‑step breakdown using Armorsmith Designer makes it so much clearer. I especially appreciate the tip about measuring accurately and using the mirror function to save time. Also, the mention of adjusting for body proportions like arm length and chest width is something I hadn't considered before. It's great to see a practical approach that goes beyond just inputting numbers. ok win game online